And the Baking Begins...
Last year, my friend Peggy made these amazing fruitcakes. Only she doesn't call them fruitcakes because people would turn their noses up at them just because of the name. And, no doubt, there is reason to suspect these dense holiday creations. But Peggy calls hers Holiday Jeweled Pecan Loaves to disguise their true nature. And they are wonderful! But what wouldn't be with dates, candied cherries and pineapple chunks, and seven cups of pecans. Having just vacuum sealed 40 cups of pecans for my freezer, I already had the most expensive ingredient on hand. In anticipation of this year's baking, I had bought the candied fruit on sale at the end of last Christmas and frozen it at Peggy's suggestion. She usually make fifteen, yes, fifteen batches of this recipe a year. Since each recipe makes seven little loaves, that is 105 cakes!!!
I wish I had taken pictures along the way, but it was rather hard to do since the "dough" was really sticky and I was up over my wrists in my big enameled pan wearing gloves trying to mix well. Somehow, stopping to use the camera was not really an option. As I was stuffing the pans with the gooey goodness, I had to stop and call Peggy for tips. I wish I had called her before I started. She advised that I pack the ingredients into the pans halfway and then fill and pack the top half so as not to have air holes in the cakes. Also, she uses the disposable aluminum pans so it is easier for them to release from the pans. I had bought three more metal pans (non-stick) to go with my four regular pans. I sprayed them well, but hindsight has now taught me to line the pans with waxed paper, even though that is a tedious and time-consuming task. It would be better than putting cakes back together.
 So I ran a knife around the edges and turned them over on a rack to cool hoping gravity would do the hard part and coax them out intact. Well, I didn't do too badly for my first try.
 Four out of the seven released without harm. Two had minor damage, and only one had some major reconstruction. I have to say the non-stick pans did just as well as the others. (There was concern.)

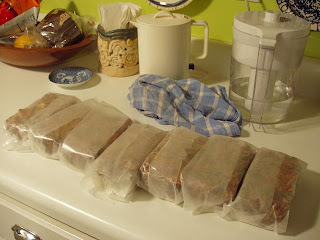
 They are all wrapped in waxed paper now to completely cool and hopefully heal themselves. I'll show them dressed for presentation in another post.
I wish I had taken pictures along the way, but it was rather hard to do since the "dough" was really sticky and I was up over my wrists in my big enameled pan wearing gloves trying to mix well. Somehow, stopping to use the camera was not really an option. As I was stuffing the pans with the gooey goodness, I had to stop and call Peggy for tips. I wish I had called her before I started. She advised that I pack the ingredients into the pans halfway and then fill and pack the top half so as not to have air holes in the cakes. Also, she uses the disposable aluminum pans so it is easier for them to release from the pans. I had bought three more metal pans (non-stick) to go with my four regular pans. I sprayed them well, but hindsight has now taught me to line the pans with waxed paper, even though that is a tedious and time-consuming task. It would be better than putting cakes back together.
 So I ran a knife around the edges and turned them over on a rack to cool hoping gravity would do the hard part and coax them out intact. Well, I didn't do too badly for my first try.
 Four out of the seven released without harm. Two had minor damage, and only one had some major reconstruction. I have to say the non-stick pans did just as well as the others. (There was concern.)
 They are all wrapped in waxed paper now to completely cool and hopefully heal themselves. I'll show them dressed for presentation in another post.
Comments
Sally